Showing posts with label a. Show all posts
Showing posts with label a. Show all posts
Tuesday, March 4, 2014
Build a better mousetrap
There must be more mousetrap designs than any other contraption. Stig Schjervheim from Norway made this mousetrap with hand tools. Patterned after an 18th century trap, he says hes already captured eight mice. Thanks for the video, Stig!
Read More..

Make a rustic wheelbarrow for the garden
Inspiration from an unlikely source
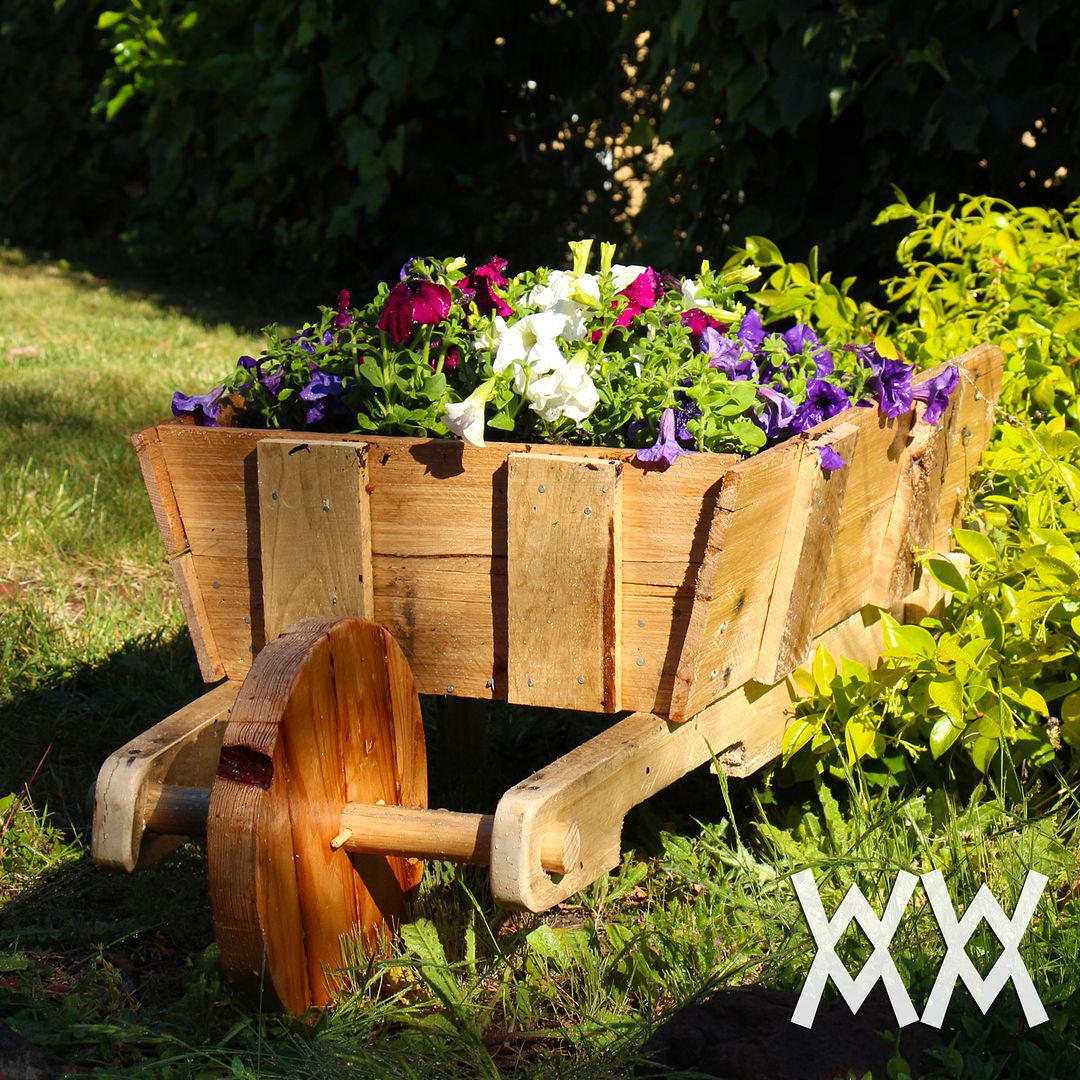
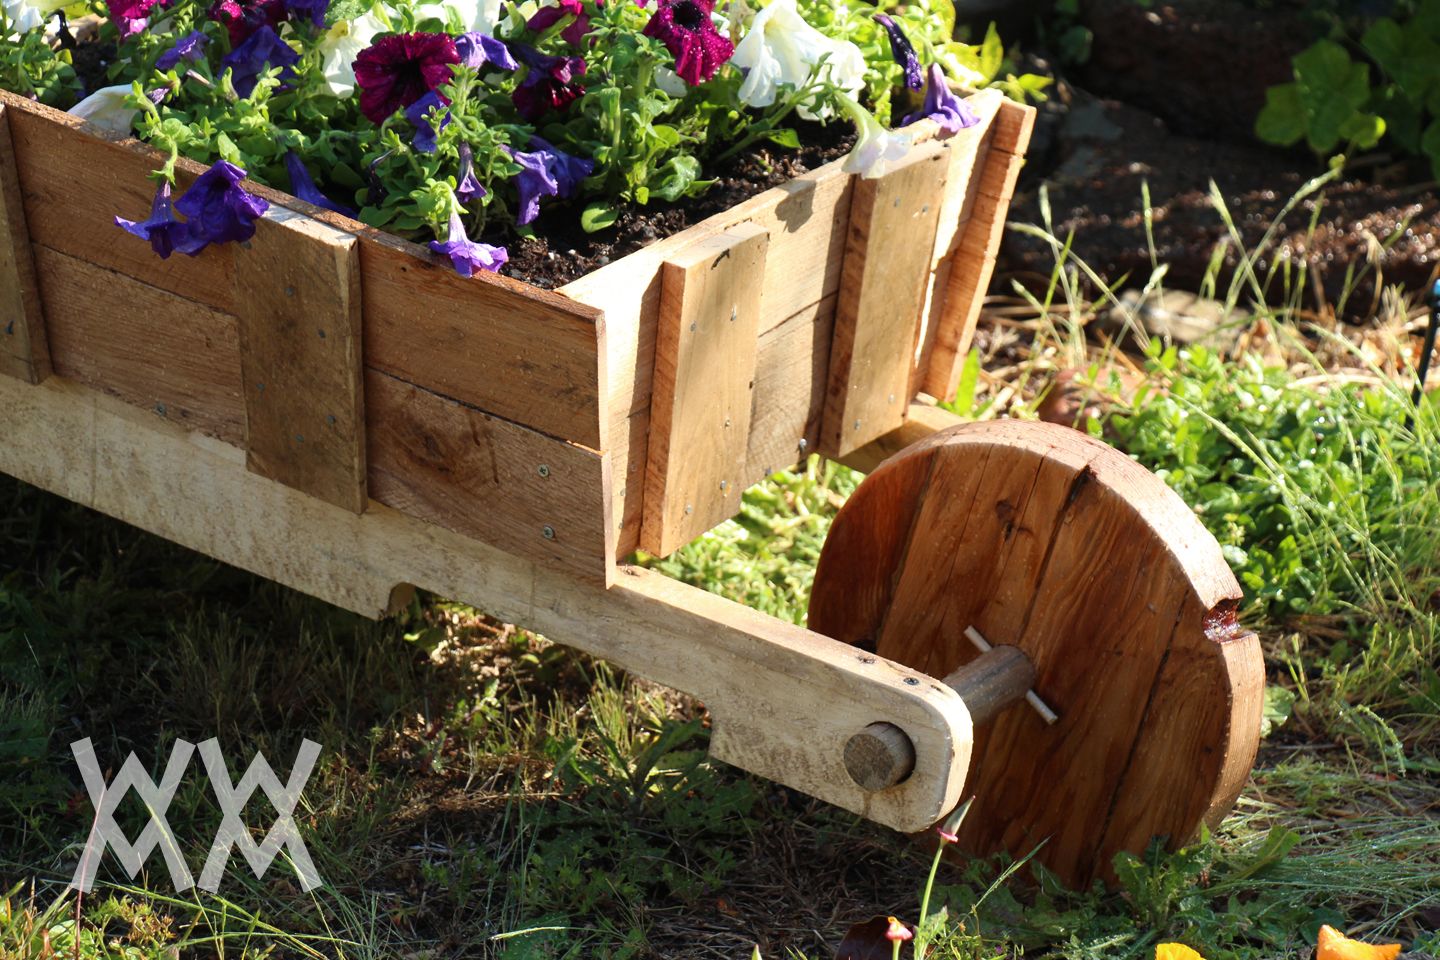
 I was watching an episode of Adventure Time recently featuring the Snow Golem. In one scene he was pushing around a rustic little cart. Even though it is just cartoon drawing, I love the wooden wheels (complete with a chip that I included quite by accident in my wheelbarrow) and the unevenness of the side boards.
I was so intrigued by the simplicity whimsy of it that I decided to make one for the garden. A perfect pallet wood project.
Soon, my idea evolved and became a bit more stylish as I transformed it into a wheelbarrow. Inspiration is one of those things that just happens. The trick is to keeping yourself open to it all the time.
Relax. Its rustic.
The advantage to rustic projects is that you really dont need to stress out about any of this. No protractors or exact measurements needed. If parts are a little off, dont sweat it: its a rustic project! Got any rusty nails lying around? Use them! If a nail bends over when you are pounding it in, leave it that way. And any uneven, split boards and chipped out wood you use adds to its charm, just as with the Snow Golems little cartoon cart.
 Plans
Plans
This is another project that anyone can build with very little experience and limited tools. I used my miter saw, but you could just as easily use a circular saw or a jig saw. You will need a hammer and nails and a drill and screws.
If you decide to use pallet wood (its free!) watch the first part of my Rustic Side Table video to see my method for breaking them apart into wood you can use.
*****
Read More..
I was so intrigued by the simplicity whimsy of it that I decided to make one for the garden. A perfect pallet wood project.
Soon, my idea evolved and became a bit more stylish as I transformed it into a wheelbarrow. Inspiration is one of those things that just happens. The trick is to keeping yourself open to it all the time.
Relax. Its rustic.
The advantage to rustic projects is that you really dont need to stress out about any of this. No protractors or exact measurements needed. If parts are a little off, dont sweat it: its a rustic project! Got any rusty nails lying around? Use them! If a nail bends over when you are pounding it in, leave it that way. And any uneven, split boards and chipped out wood you use adds to its charm, just as with the Snow Golems little cartoon cart.
This is another project that anyone can build with very little experience and limited tools. I used my miter saw, but you could just as easily use a circular saw or a jig saw. You will need a hammer and nails and a drill and screws.
If you decide to use pallet wood (its free!) watch the first part of my Rustic Side Table video to see my method for breaking them apart into wood you can use.
- WWMM Rustic wheelbarrow plans (PDF)
- SketchUp file
*****
Friday, February 21, 2014
Im a Fool For Dovetails
A while ago, infact about a year now, when I was building my hybrid version of the Nicholson Workbench I came to the point of constructing the wrap for around the benchtop. I looked long and hard at dovetailing the corners and flinched, I decided that I wanted to just get the job finished and dovetailing the ends of eight foot long boards didnt appeal to me a whole lot. Its possible, but I was worried it would come out looking like crap, so I decided to just do some butt joints and call it a day. (To read the blog entry concerning this decision you can click HERE)
Now in the construction of this Joinery Bench I have made some different decisions about the bench top wrap.
 1. This bench is made to travel, to knock down into smaller pieces so to easily and conveniently fit into my van and travel from demo to demo with me. I decided that to use soft pine again, like what I wrapped the Nicholson in, would be a mistake as there are many more bangs and bumps on the road. I wanted something "bulletproof" so I chose hickory. Not any hickory but a beautiful board of 1 1/2 inch thick 11 inches wide, straight grain and knot free hickory, This board was a thing of beauty. Still is beautiful, just in slightly smaller pieces now.
2. I want to put a tool rack in the back wrap of the bench to hold a variety of chisels, rasps, and marking tools so theyre in quick reach for demos and convenient for use.
3. This bench will see more of the public than almost anything else I build will ever. So I guess it means more to me to show off a little on the piece. Therefore Im actually pulling the trigger of the dovetails this time.
4. And probably he best reason of all, It has been way too long since Ive had a project that used dovetails, I really enjoy cutting them, I find them challenging and intriguing, and good hand cut dovetails have always been to me, the sign of competence and skill in woodworking. So to use a skill, before I have to completely reteach myself the skill. It is time to dovetail.
 I really dont have a preference of pins first or tails first. Ive cut the joint both ways and it makes no difference to me. If you align things correctly then there is no reason to have an issue anyway. I struggled with dovetails so much when I started woodworking. The thing that finally put it over the top for me was sitting down and constructing a set of saw guides. These helped me take my mind off the worry of making the cut and allowed me to concentrate more on how the joint should be constructed. Im not sure what my block was but removing the worry of how to make the cut freed my mind and suddenly things all fell into place.
I love the guides for what they did for me, but after several years of use, they definitely show their age, The cuts were not all crisp the last time I used them, the wood of the jigs had been worn away by the set of the saws teeth. So after this realization I decided it was time to replace them or figure out how to move along without them. Well, I decided not to replace them, They still hang on the peg board of my shop, dutifully reminding me of where I came from, reminding me of a time when I couldnt saw a straight line without help. I moved on to cutting the joint more free hand.
 The wrap for the top is one of the best tests for that "guide-less" cutting that Ive had yet. Even if I wanted to use the trusty old gauges, I couldnt. They were all made to fit over standard 1X boards. The hickory is 2X, so no dice on the gauges, and all the better for me.
As I cut the dovetails I realize that I havent completely decided on a "method of work" for doing this. I guess Im still figuring it out, what works best for me. Sometimes I chop the waste away with chisel and mallet, sometimes I saw it out, sometimes I drill it away and then saw it away. I always use a small rasp to refine the fit, but I never do them the exact same way twice. Im not sure that I could convince myself that this makes me more versatile. Realistically I would say that it probably just makes me indecisive.
Anyhow here is a series of pics from cutting these dovetails, I can guarantee next time it will be different, I guess as long as the results are consistent and satisfactory, Im not gonna complain.



Cheers
Oldwolf
Read More..
Now in the construction of this Joinery Bench I have made some different decisions about the bench top wrap.
2. I want to put a tool rack in the back wrap of the bench to hold a variety of chisels, rasps, and marking tools so theyre in quick reach for demos and convenient for use.
3. This bench will see more of the public than almost anything else I build will ever. So I guess it means more to me to show off a little on the piece. Therefore Im actually pulling the trigger of the dovetails this time.
4. And probably he best reason of all, It has been way too long since Ive had a project that used dovetails, I really enjoy cutting them, I find them challenging and intriguing, and good hand cut dovetails have always been to me, the sign of competence and skill in woodworking. So to use a skill, before I have to completely reteach myself the skill. It is time to dovetail.
I really dont have a preference of pins first or tails first. Ive cut the joint both ways and it makes no difference to me. If you align things correctly then there is no reason to have an issue anyway. I struggled with dovetails so much when I started woodworking. The thing that finally put it over the top for me was sitting down and constructing a set of saw guides. These helped me take my mind off the worry of making the cut and allowed me to concentrate more on how the joint should be constructed. Im not sure what my block was but removing the worry of how to make the cut freed my mind and suddenly things all fell into place. I love the guides for what they did for me, but after several years of use, they definitely show their age, The cuts were not all crisp the last time I used them, the wood of the jigs had been worn away by the set of the saws teeth. So after this realization I decided it was time to replace them or figure out how to move along without them. Well, I decided not to replace them, They still hang on the peg board of my shop, dutifully reminding me of where I came from, reminding me of a time when I couldnt saw a straight line without help. I moved on to cutting the joint more free hand.
As I cut the dovetails I realize that I havent completely decided on a "method of work" for doing this. I guess Im still figuring it out, what works best for me. Sometimes I chop the waste away with chisel and mallet, sometimes I saw it out, sometimes I drill it away and then saw it away. I always use a small rasp to refine the fit, but I never do them the exact same way twice. Im not sure that I could convince myself that this makes me more versatile. Realistically I would say that it probably just makes me indecisive.
Anyhow here is a series of pics from cutting these dovetails, I can guarantee next time it will be different, I guess as long as the results are consistent and satisfactory, Im not gonna complain.
Cheers
Oldwolf
Thursday, February 20, 2014
A Weekend In Photos
Just a quick note and a series of pictures from this past weekend.
As some of you have heard me talk about, my other big hobby is Viking Age Reenactment, I amd a Member of a group called Tribe Woden Thor. (click on the name and check out our page!) There was a local festival celebrating Norwegian Constitution Day in Westby Wisconsin this week. Most of us live near by and with the links to Norse heritage we have set up a living history display there for the past few years.
For a long time I have been wanting to do some type of medieval woodworking demo at these type of events and this past weekend I finally pulled one together. If you look at medieval furniture carvings, those that did survive this long, you can see a lot of similarities between them and those carvings found in the 17th century, like the ones done by one of my heroes, Peter Follansbee. So thats what I decided to work with, I would set up my travel joiners bench and begin work on carving the pieces of a bible box. I spent the weekend working and finished the front panel, theres a lot of carving left to go, but I dont think I went to slow considering how much I stopped to visit with people and how new I am to this skill set.
Anyhow I guess that would wrap up a quick note for me...its all picture from here. Enjoy.
Come to think of it, heres a link to where you can download the article in .pdf I highly recommend you do. CLICK HERE.
Hope everyone out there had just as much fun this weekend as I did.
Cheers.
Oldwolf
Read More..
As some of you have heard me talk about, my other big hobby is Viking Age Reenactment, I amd a Member of a group called Tribe Woden Thor. (click on the name and check out our page!) There was a local festival celebrating Norwegian Constitution Day in Westby Wisconsin this week. Most of us live near by and with the links to Norse heritage we have set up a living history display there for the past few years.
For a long time I have been wanting to do some type of medieval woodworking demo at these type of events and this past weekend I finally pulled one together. If you look at medieval furniture carvings, those that did survive this long, you can see a lot of similarities between them and those carvings found in the 17th century, like the ones done by one of my heroes, Peter Follansbee. So thats what I decided to work with, I would set up my travel joiners bench and begin work on carving the pieces of a bible box. I spent the weekend working and finished the front panel, theres a lot of carving left to go, but I dont think I went to slow considering how much I stopped to visit with people and how new I am to this skill set.
Anyhow I guess that would wrap up a quick note for me...its all picture from here. Enjoy.
 |
| My set up just before I get started. |
 |
| The rest of the tools I brought, no the pliers themselves are not old, Viking style, but I needed them to put together the workbench. |
 |
| My set up from the other direction, the "publics" Point of View. |
 |
| Some more of our set up, we tried to stay modest so only a small part of our medieval weapons collection made it to the table. Most of these pieces are hand forged by a blacksmith friend of the Tribe. |
 | ||
| A bit of "everyday life" items with reproduction coins, the board game hnefatafl, An ancestor of chess, it takes five minutes to learn to play and a whole lot longer to master. |
 |
| Some of the armor set up, We had several stands sporting various armor as well. |
 |
| Hard at work starting the carving. |
 |
| "V" chisel sweep to the left. |
 |
| The arches are finished. |
 |
| While I worked, and spent time visiting with the public, so did my good friend Patrick, AKA Einar the Scar,. He weaves chain maile armor and he is supposed to be working on a new shirt for me...(just a reminder Pat) |
 |
| As with any festival, there is a parade and the Tribe usually marches to give the crowd some loud medieval entertainment. We had a smaller crew show up this year, to many people stuck at work, but we made the best of it, had a lot of fun, and judging by the crowds reactions, they enjoyed it too. |
 |
| Thats me on the right hand side. Kind of a mush up of different periods of armor, but I was looking to show off a little this weekend I guess. Most floks who arent serious reenactors wouldnt notice. |
 |
| Back at the tent and Ive finished carving the front panel. Included is a blow up of the picture I used to carve this from. It is based on the carved box Peter Follansbee wrote about in Woodwork Magazine. |
Hope everyone out there had just as much fun this weekend as I did.
Cheers.
Oldwolf
Thursday, February 13, 2014
Ladies Gentlemen We Have A Winner!
Nothing too fancy here today other then a quick, not so well shot, video I took of my hand on the Bosch, making it glide oh-so- smoothly.
Im again blogging from my phone, so while Ill be keeping it brief, I do want to thank Rob from Woodwerks Supply. After posting my photo of the saw on twitter, Rob & I got into a conversation about it. He was nice enough to test out their in-store model against the Festool Kapex and post about it in the woodtalkonline.com forums. Though the Kapex won in dust collection, they seemed evenly matched on all other terms. As the Bosch requires 2" less space behind the fence, accepts standard 12" bladed (I love the Forrest ChopMaster) and is $500.00 cheaper it has won my heart and I placed an order for one yesterday. Once I get it Ill share my review and thoughts on the new cross cutting king.
Until then, how do you cross cut?
Read More..
Im again blogging from my phone, so while Ill be keeping it brief, I do want to thank Rob from Woodwerks Supply. After posting my photo of the saw on twitter, Rob & I got into a conversation about it. He was nice enough to test out their in-store model against the Festool Kapex and post about it in the woodtalkonline.com forums. Though the Kapex won in dust collection, they seemed evenly matched on all other terms. As the Bosch requires 2" less space behind the fence, accepts standard 12" bladed (I love the Forrest ChopMaster) and is $500.00 cheaper it has won my heart and I placed an order for one yesterday. Once I get it Ill share my review and thoughts on the new cross cutting king.
Until then, how do you cross cut?
Monday, February 10, 2014
Beginnings of a built in
Like most built ins, this one is beginning with a platform. In the pics below, you can see how Ive framed in with 2x4s to make the structure of the platform. There is a wall register, so Ive added an elbow and extension so the air flow will come out of the front of the built in when finished. Then, Ive covered the frame with 1/2" mdf to complete the platform. There was also some security wire to contend with, that was previously run under the old carpet - surprise!

You will also notice that Ive made the face frames for the lower cabinet units, leaning against the wall. Next up - casework...

Read More..
You will also notice that Ive made the face frames for the lower cabinet units, leaning against the wall. Next up - casework...
A collection of shop photos
I realized recently that I have never done a post of just shop photos, where you can see the layout of the various work spaces throughout the buildings on the property. We have been working on it all since 1998 and its grown over time to accommodate a lot of flexible spaces. There is also a stand up attic over the shop that accommodates lumber and veneer up to 12 long and a concrete floor crawlspace with wheelchairs for mobility, where the boiler, air compressor and additional lumber, pattern and jig storage live. Stuff expands to fill it all of course, and we dream about a better/bigger metal shop, but not this week for sure ... maybe sometime though ... Click the photos to enlarge them and enjoy your tour ...
 Summer view
 Winter view with the finish room on the right
 Side porch with a Safety Speed Cut panel saw, lumber and ply storage shed with the blower at the far end, and a separate, free standing shed for sawdust ...
 Summer porch use ...typically on Friday afternoons
 The interior of the 16 x 22 finish room ... the tv cabinets (scroll down on that post) are still lurking under the big green drop cloth
 standing on a stool, looking from east to west ... note dueling table saws with foot operated off switches, nested placement of jointer and planer, and dust collection under the strip oak, radiant heated floor.
 looking from east to south showing the sanders (on wheels and the 16 of counters and drawers at workspace one.
 radial and chop saw for rough and finish cuts on the same fence system
 looking toward workspace #4, on wheels, 42 x 60 with the lathe tools on the back side, and at the outfeed of the sander with a light for defect spotting. The gray table in the foreground has a removable top over a router table on wheels.
 workspace two, also on wheels, (behind the headboard), 43 x 84, with a pattern vise, sink and additional 8 bench with a vise.
 workspace #1, 44 x 96 x 30 high with power on the four corners, also on wheels. Actually, everything that can be is on wheels.
 workspace #3, where I work when Im in the shop.
 The cnc upstairs ... best place to see what we do with this is at this link here ... And, if youre wondering how we got all 1400 pounds and 11 feet of it to the second floor here are some photos of that operation .... unbelievable in hindsight ....
 workspace upstairs with mortiser, drill press, sander and bandsaw, adjacent to the cnc so Trevor can do two jobs at once.
 library in a small hallway between the cnc and the office
 my main workspace with computer, phone, fax, scanner, printer and music
 southeast end of the office with another computer for Will or Sam to do their CAD drawings and email
 a small collection of models in the bathroom
 my board of finish samples and hardware for clients when they come ..this photo also works as an email to clients out of the area ...
 looking out the office window and door to the pond
 with the ducks recently back in town....
 The metal shop is at the house, attached to the end of the garage ... More photos here
 Looking into the shop with the double doors open ..
I hope to soon add plan view drawings of the shop for my own records but Ill have to do them first ... The woodshop was planned as a workshop, but built as a 3 bedroom two bath house where we lived for two years while we were waiting to sell our former house in Arlington ... I have some good pictures of the shop as a house that Ill post later too ... All for now ... If you made it all the way to here, you might also enjoy these photos HERE showing how we got our 1400 pound cnc machine installed on the second floor. (Through the second story window)
Read More..
Summer viewWinter view with the finish room on the rightSide porch with a Safety Speed Cut panel saw, lumber and ply storage shed with the blower at the far end, and a separate, free standing shed for sawdust ...Summer porch use ...typically on Friday afternoonsThe interior of the 16 x 22 finish room ... the tv cabinets (scroll down on that post) are still lurking under the big green drop clothstanding on a stool, looking from east to west ... note dueling table saws with foot operated off switches, nested placement of jointer and planer, and dust collection under the strip oak, radiant heated floor.looking from east to south showing the sanders (on wheels and the 16 of counters and drawers at workspace one.radial and chop saw for rough and finish cuts on the same fence systemlooking toward workspace #4, on wheels, 42 x 60 with the lathe tools on the back side, and at the outfeed of the sander with a light for defect spotting. The gray table in the foreground has a removable top over a router table on wheels.workspace two, also on wheels, (behind the headboard), 43 x 84, with a pattern vise, sink and additional 8 bench with a vise.workspace #1, 44 x 96 x 30 high with power on the four corners, also on wheels. Actually, everything that can be is on wheels.workspace #3, where I work when Im in the shop.The cnc upstairs ... best place to see what we do with this is at this link here ... And, if youre wondering how we got all 1400 pounds and 11 feet of it to the second floor here are some photos of that operation .... unbelievable in hindsight ....workspace upstairs with mortiser, drill press, sander and bandsaw, adjacent to the cnc so Trevor can do two jobs at once.library in a small hallway between the cnc and the officemy main workspace with computer, phone, fax, scanner, printer and musicsoutheast end of the office with another computer for Will or Sam to do their CAD drawings and emaila small collection of models in the bathroommy board of finish samples and hardware for clients when they come ..this photo also works as an email to clients out of the area ...looking out the office window and door to the pondwith the ducks recently back in town....The metal shop is at the house, attached to the end of the garage ... More photos hereLooking into the shop with the double doors open ..I hope to soon add plan view drawings of the shop for my own records but Ill have to do them first ... The woodshop was planned as a workshop, but built as a 3 bedroom two bath house where we lived for two years while we were waiting to sell our former house in Arlington ... I have some good pictures of the shop as a house that Ill post later too ... All for now ... If you made it all the way to here, you might also enjoy these photos HERE showing how we got our 1400 pound cnc machine installed on the second floor. (Through the second story window)
Subscribe to:
Posts (Atom)