Monday, February 24, 2014
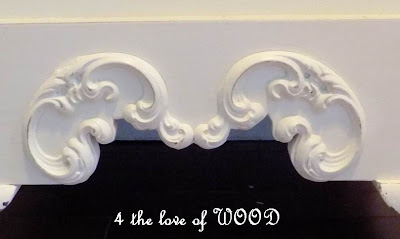
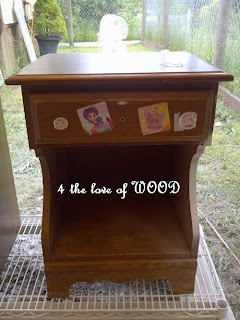
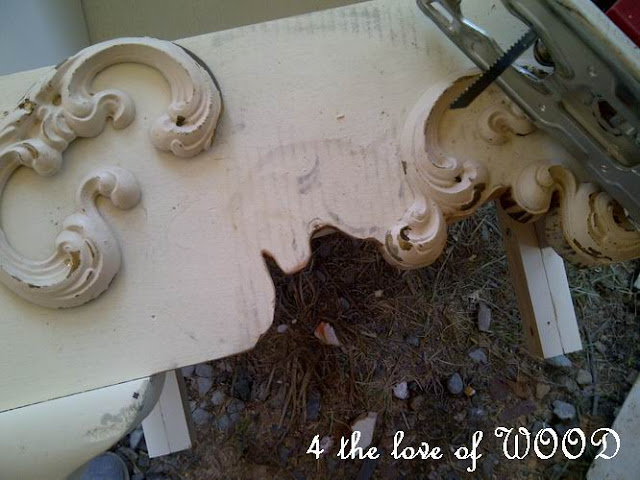
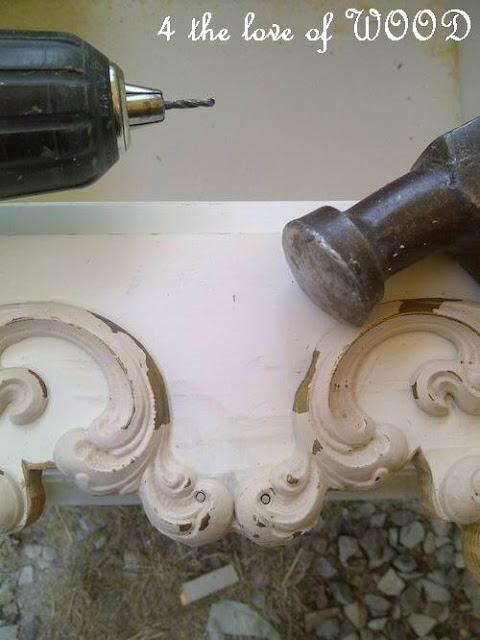
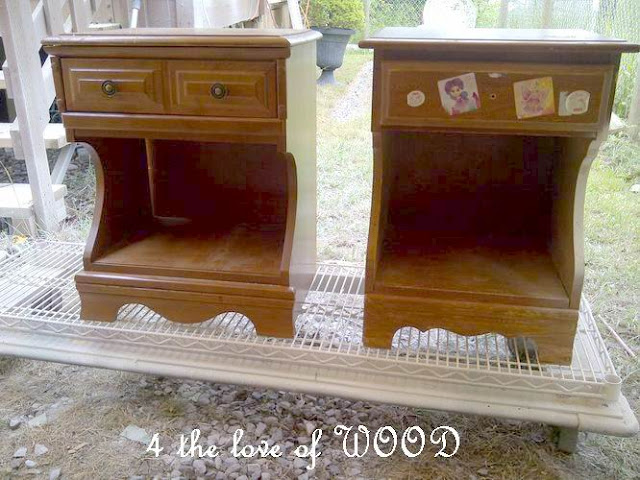
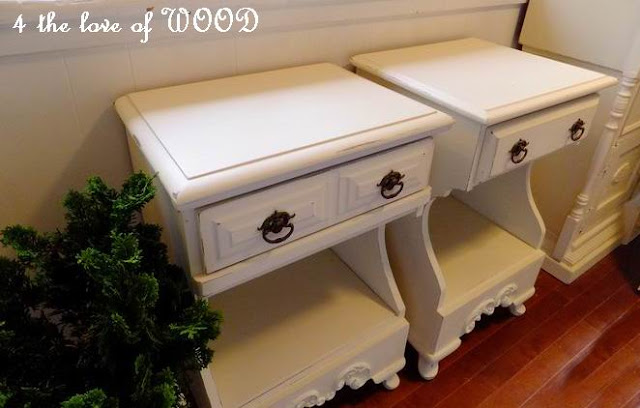
APPLIQUE TRICK his and hers bedside tables


Sunday, February 23, 2014
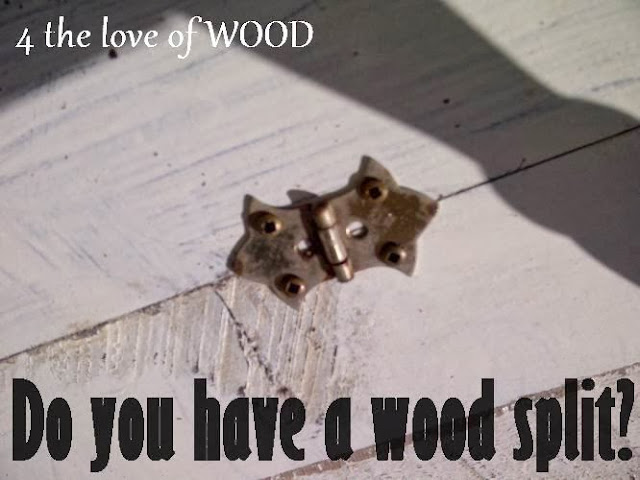
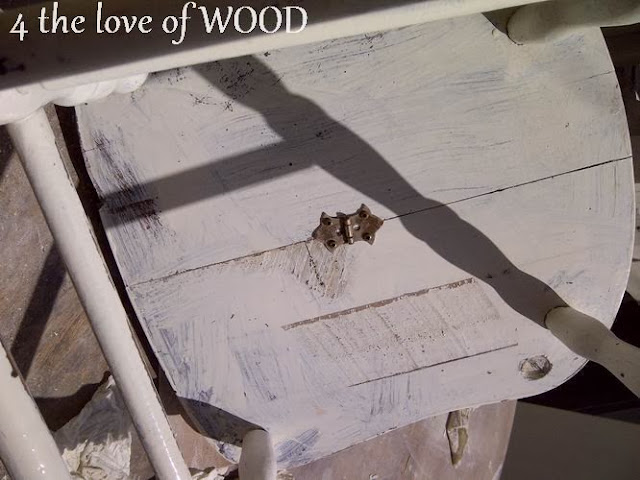
FIXING WOOD SPLIT hinge


Saturday, February 22, 2014
Garden Office Design Plans
Professional Home Office Designs - garden office rooms and timber ...
Professional Home Office Designs - garden office rooms and timber

Sultan Home Garden Office
Sultan Home Garden Office

Tunnel Vision
After I put up my post the other night and crawled in bed, it hit me. If I had been allowed to continue, blinders up and strapped in with full on tunnel vision, I would have completely blew past getting the carving done. If that had happened Im not sure what I would have done. The pieces wouldnt have matched and the carving is one of the cool things that sets these apart and will make them work well at a faire. I would have had to half ass it and try to accomplish the carving on the assembled bench, that would have sucked.
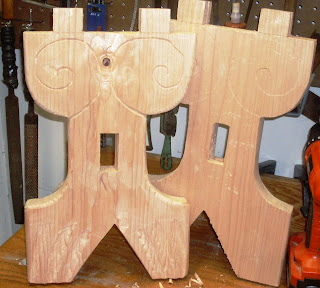
Tunnel vision confessions aside, I have been enjoying the process of learning to do some simple, by hand, chip carving. When the family and I made the trip to Madison several weeks ago, I got to stop by the Woodcraft store there. Although I came home with a few different goodies, the reason I insisted was so I had the chance to pick up a couple of decent carving tools. I was hoping to find a starter set of some kind, there just wasnt one there. In some of the reading Ive done since I guess I understand why, Carving is such an individual pursuit that there would be no way to have a cut and dry, one size fits all set. I have seen sets out there, some even assembled by woodcraft, in the end I am glad there wasnt one in the store.
If there had been a beginners set, lets say six or eight chisels in size, I would have bought it, and I would have walked out of the store with only that, I had a limit of around 100 dollars to spend and that would have sapped that up and probably over done me. Instead I was forced to take my time and look at all the chisels offered and make a measured decision about what I wanted to accomplish and what I would need to do that.

 I thought about the tools I saw him use in the demos and the techniques I could identify with, and that is what I based my first choices of carving tool on. The first was obvious, a decent "V" gouge. one I could drive in one hand and mallet with the other. That simple decision eliminated half my choices. full handles, none of the palm ones. Now it was choosing the size. That was pretty easy. One down.
The other thing I wanted was a shallower gouge. That took a little more searching and deciding, but eventually I narrowed it down and pulled the trigger.
Working with these chisels has been a dream to learn with. They are both Swiss made by Pfeil, and using them is very intuitive. They are beefy enough the dont significantly deflect under the blow of a mallet, yet fine enough that paring with them is a dream too. I know that the carving I have done on the saw benches is very simple and straight forward, nothing to inspire, but one must start somewhere. and I have had many, many more painful starts than this one. I believe I am following the best proscribed path on this one. Starting with two and mastering them and Ill add more when it seems appropriate.
Cheers!
Oldwolf
Friday, February 21, 2014
Im a Fool For Dovetails
Now in the construction of this Joinery Bench I have made some different decisions about the bench top wrap.

2. I want to put a tool rack in the back wrap of the bench to hold a variety of chisels, rasps, and marking tools so theyre in quick reach for demos and convenient for use.
3. This bench will see more of the public than almost anything else I build will ever. So I guess it means more to me to show off a little on the piece. Therefore Im actually pulling the trigger of the dovetails this time.
4. And probably he best reason of all, It has been way too long since Ive had a project that used dovetails, I really enjoy cutting them, I find them challenging and intriguing, and good hand cut dovetails have always been to me, the sign of competence and skill in woodworking. So to use a skill, before I have to completely reteach myself the skill. It is time to dovetail.
 I really dont have a preference of pins first or tails first. Ive cut the joint both ways and it makes no difference to me. If you align things correctly then there is no reason to have an issue anyway. I struggled with dovetails so much when I started woodworking. The thing that finally put it over the top for me was sitting down and constructing a set of saw guides. These helped me take my mind off the worry of making the cut and allowed me to concentrate more on how the joint should be constructed. Im not sure what my block was but removing the worry of how to make the cut freed my mind and suddenly things all fell into place.
 I love the guides for what they did for me, but after several years of use, they definitely show their age, The cuts were not all crisp the last time I used them, the wood of the jigs had been worn away by the set of the saws teeth. So after this realization I decided it was time to replace them or figure out how to move along without them. Well, I decided not to replace them, They still hang on the peg board of my shop, dutifully reminding me of where I came from, reminding me of a time when I couldnt saw a straight line without help. I moved on to cutting the joint more free hand.

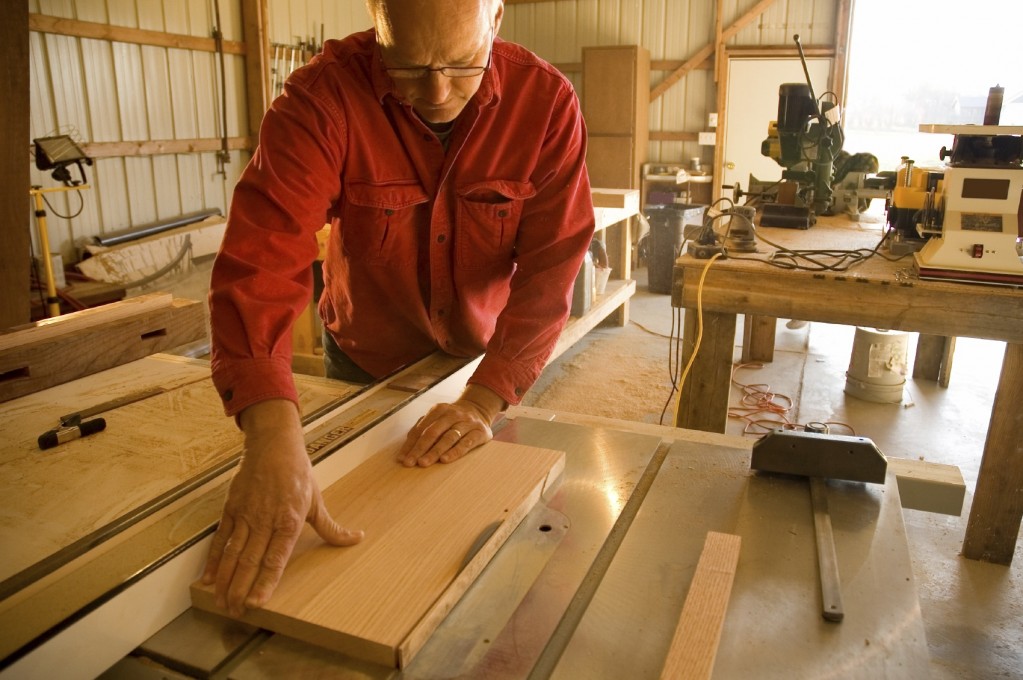
As I cut the dovetails I realize that I havent completely decided on a "method of work" for doing this. I guess Im still figuring it out, what works best for me. Sometimes I chop the waste away with chisel and mallet, sometimes I saw it out, sometimes I drill it away and then saw it away. I always use a small rasp to refine the fit, but I never do them the exact same way twice. Im not sure that I could convince myself that this makes me more versatile. Realistically I would say that it probably just makes me indecisive.
Anyhow here is a series of pics from cutting these dovetails, I can guarantee next time it will be different, I guess as long as the results are consistent and satisfactory, Im not gonna complain.


Cheers
Oldwolf
! Grizzly Woodworking Equipment Woodworking Plans

Grizzly Woodworking Equipment
Woodworking Plans
Do-it-Yourself Patterns and Crafts, Woodworking kits, Furniture Plans Plus Much, Much More. Will Show You How to Make 16,000 Different Woodworking Plans. Use The Plans For Fun, Functionality or Profit!
Grizzly Woodworking Equipment. Wood is a single of the most lovely, durable and versatile supplies that you can operate with although on a do it yourself project. The beauty of a cabinet door that is completed in wood can not be matched by any other material regardless of whether natural or man produced. As with any project, you would need a detailed set of plans although you operate with wood and wood based materials. This is why it is encouraged that you use a detailed set of woodworking plans after you program to extensively use wood primarily based supplies to comprehensive the project that you have embarked on.
Now let us examine why woodworking plans are essential in any wood based do it yourself project. To begin with, these plans assistance you get rid of waste. If you start a woodworking project without the need of a firm program, the chances are that you would finish up employing additional wood that you originally intended to. Most of the wood primarily based projects would demand in depth assemblies and sub assemblies.
When you start your project, you would be ideally working with person members of wood and finishing them individually before assembling them. If you do not have the proper woodwork plans, you could finish up with mismatching wood members at the time of assembly. This could lead to high-priced expense and time overruns in the project. All these issues can be avoided by using a effectively laid out set of wood plans.
The other advantage that you could have if you use woodworking plans are that you would be prepared with all the tools and implements that you would call for for finishing the wood based project. Often we obtain that we do not have access to a particular tool in the middle of a woodworking project. This predicament could lead to a loss of time and sometimes you may even have to abandon the project in case a unique tool is not out there. All these issues can be avoided if you have a detailed plan at the onset. Grizzly Woodworking Equipment
Grizzly Woodworking Equipment Causes
Constant Promoting - The romance of woodworking will need to be balanced with the consistent advertising and marketing and marketing significant to retain the operate coming in. In time, phrase of mouth brings in a lot of operate if you create a great recognition. Until ultimately then, you will need to have to get the phrase out routinely. Immediately after the work arrives in you have to have excellent manufacturing systems so you can full the tasks promptly and continue to keep the cash flowing. If jobs think about also really lengthy and the dollars movement stops, it can turn into tricky to shell out the expenses. Talking of cash flow, you ought to make and adhere to normal assortment methods. This is 1 region where by several woodworkers fail. The payment for the carry out will want to be as crucial as the carry out by itself. If you are lax in accumulating, you will run into prospects who fall short to shell out you and this will trigger truly critical earnings movement troubles.The Compact company - Even nonetheless you like woodworking, you will require to do the property enterprise if you are to make a dwelling at it. Good benefits ordinarily calls for an in-depth data of each woodworking and small business management. If you under no circumstances have each, I recommend you hesitate to leap in until you have honed your enterprise abilities.
Seeking back again I recognize that my lack of expertise in the course of my startup fairly a few decades back could have been offset with some widespread facts and yet another particular person to advise me.Sadly I had to find out most components by trial and error.
Just about just about every and every single and just about every week, I take the time to go via the comments that my viewers make about my woodworking web page. 1st of all I want to them for taking the time to comment, I undoubtedly value all of the comments and ideas. This preceding week there was a comment from a gentleman, who expressed a want to get into woodworking. As a man who is passionate about woodworking, I want to welcome him to the fold. And I want to give you him all of the recommendations and encouragement probable in his endeavors.Grizzly Woodworking Equipment
More Grizzly Woodworking Equipment Clip :
Tag : How Do You Grizzly Woodworking Equipment, How To Get Rid Off Grizzly Woodworking Equipment, Best for Grizzly Woodworking Equipment, Where To Buy Grizzly Woodworking Equipment, What Is The Best Price For Grizzly Woodworking Equipment.
Thursday, February 20, 2014
A Weekend In Photos
As some of you have heard me talk about, my other big hobby is Viking Age Reenactment, I amd a Member of a group called Tribe Woden Thor. (click on the name and check out our page!) There was a local festival celebrating Norwegian Constitution Day in Westby Wisconsin this week. Most of us live near by and with the links to Norse heritage we have set up a living history display there for the past few years.
For a long time I have been wanting to do some type of medieval woodworking demo at these type of events and this past weekend I finally pulled one together. If you look at medieval furniture carvings, those that did survive this long, you can see a lot of similarities between them and those carvings found in the 17th century, like the ones done by one of my heroes, Peter Follansbee. So thats what I decided to work with, I would set up my travel joiners bench and begin work on carving the pieces of a bible box. I spent the weekend working and finished the front panel, theres a lot of carving left to go, but I dont think I went to slow considering how much I stopped to visit with people and how new I am to this skill set.
Anyhow I guess that would wrap up a quick note for me...its all picture from here. Enjoy.
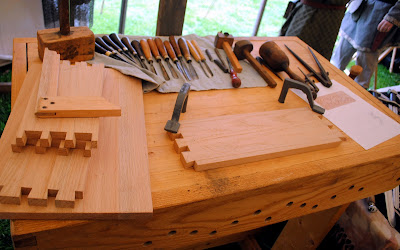 |
| My set up just before I get started. |
 |
| The rest of the tools I brought, no the pliers themselves are not old, Viking style, but I needed them to put together the workbench. |
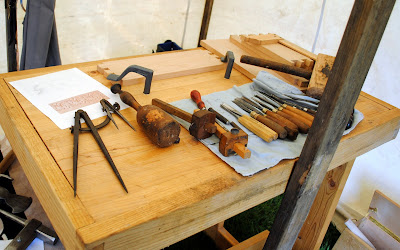 |
| My set up from the other direction, the "publics" Point of View. |
 |
| Some more of our set up, we tried to stay modest so only a small part of our medieval weapons collection made it to the table. Most of these pieces are hand forged by a blacksmith friend of the Tribe. |
 | ||
| A bit of "everyday life" items with reproduction coins, the board game hnefatafl, An ancestor of chess, it takes five minutes to learn to play and a whole lot longer to master. |
 |
| Some of the armor set up, We had several stands sporting various armor as well. |
 |
| Hard at work starting the carving. |
 |
| "V" chisel sweep to the left. |
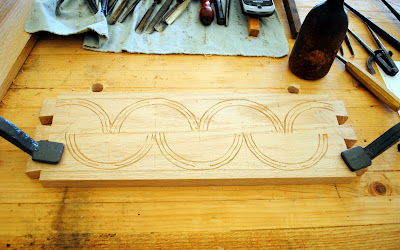 |
| The arches are finished. |
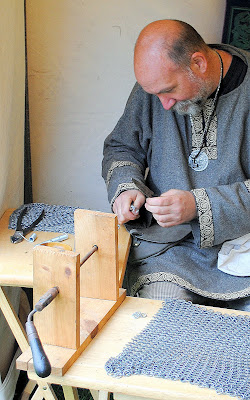 |
| While I worked, and spent time visiting with the public, so did my good friend Patrick, AKA Einar the Scar,. He weaves chain maile armor and he is supposed to be working on a new shirt for me...(just a reminder Pat) |
 |
| As with any festival, there is a parade and the Tribe usually marches to give the crowd some loud medieval entertainment. We had a smaller crew show up this year, to many people stuck at work, but we made the best of it, had a lot of fun, and judging by the crowds reactions, they enjoyed it too. |
 |
| Thats me on the right hand side. Kind of a mush up of different periods of armor, but I was looking to show off a little this weekend I guess. Most floks who arent serious reenactors wouldnt notice. |
 |
| Back at the tent and Ive finished carving the front panel. Included is a blow up of the picture I used to carve this from. It is based on the carved box Peter Follansbee wrote about in Woodwork Magazine. |
Hope everyone out there had just as much fun this weekend as I did.
Cheers.
Oldwolf
Wednesday, February 19, 2014
The Sum Office Chair
For office workers all over the nation, Allsteel has developed a new standard for the office chair - the Sum chair. The Sum chair features AutoFit technology, which provides the best in comfort without the need for control levers or even lumbar support.
The Sum chair features an automatic, self adjusting AutoFit system that will provide support for the back, providing comfort like never before. The hands free support will respond to your sitting movements, giving you support exactly where you need it the most.
The AutoFit system means that you cant adjust the chair incorrectly - as it automatically adjusts to support multiple users. The result is that the chair is ideal for virtually everyone, as it provides the best in comfort and design.
Another benefit to the Sum chair is that it offers fully adjustable arms which quickly and easily change height, width, and even depth. This will allow you to get closer to your working surface without having to drop your armrests off to where they below the working surface and inaccessible.
The chair also provides balanced, weight activated control. With the Avatar 2 system, the chair provides unlimited tasking positions without any need for manual adjustments. When you sit in the chair, it deliversa smooth balanced support throughout each position and even responds to your style of sitting!
What this all adds up to is a key benefit - the work targeting feature. The unique tilt control maintains your entire line of shight throughout even full motion. The weight activated control will allow you to keep your eyes on your work at all times and also help to minimize eye strain, reduce fatigue, and keep your work within arms reach.
If your interested in the Sum chair, all you need to do is look into the company - Allsteel. For office employees, this chair is one of the best investments you could ever make. For employers and executives, this chair is simply a must have.
Available for about the price of an executive chair, the Sum office chair will easily be your favorite reason for coming to work. The chair is very comfortable, very stylish, and offers you plenty of reasons to spend the entire day sitting at your desk.
Thank You Mr Rozaieski
I have been doing a lot of reading lately, Since getting laid up I found a ton of used woodworking books on eBay and I took advantage. I had already read James Krenovs "The Impractical Cabinetmaker" but I acquired and devoured both "The Fine Art of Cabinetmaking" and "A Cabinetmakers Notebook." I adore and identify with Krenovs take on woodworking and I can see the influences of his writing into a book I have taken to as a great inspiration "The Anarchists Tool Chest."

I have also read a book recommended to me by Bob Rozaieski, "Illustrated Furniture Making" by Graham Blackburn. I agree with his assessment that its a great book for information and ideas, but it is a bit outdated in presentation and, to some extent, in the projects used. Left to its own, I would have paged through it, absorbed what I found interesting, and put it on the shelf with my other woodworking books, only to be referenced rarely in the future. But a conversation with my daughter changed my perception on the book
Infinity, my nine year old daughter, youngest of the crew, has always been glued to my side in the workshop. I playfully call her my apprentice. She is always desperate to build something, nearly anything. "What can I build Dad?" and I admit that is such an open question that before its power, Im at a loss for words. I have no recourse but to fall back on the lame line, "What do you want to build?"
I sat her down with Mr. Blackburns book the other day and she was quietly fascinated. The book builds, hand tool skill upon skill, project on top of project, like many books do. But it doesnt complicate with words spent on types of tools or how to use the tools. It assumes youve read the authors other books that already handle this information. I can respect that approach. It walks from a simple path from easy to more complex.
1. A simple pine box with nailed butt joints
2. A book case with dados and rabbet joints
3. A slant top desk box with grooving and raised panels
4. A chest built with through dovetails
5. A side table using corner blocks
6. A dining table with blind mortise and tenons and drawboring
7. A cabinet with half blind dovetails and door construction.
8. A side chair with cabriole legs and chair construction techniques.
Finally I had an answer to her question. I believe if we use this book as a manual we can build both her skills and polish mine. Thank you Bob for convincing me to pick it up.
Ratione et Passionis
Oldwolf
The book is out of print but I had no trouble getting a used copy delivered to me through Barnes and Nobles website. Im sure you can find it through Amazon as well.
More importantly, if you are looking for great instruction, information, and podcasts shoot over to The Logan Cabinet Shoppe and check out all the great thing Bob Rozaieski has going on there.
Tuesday, February 18, 2014
Rock Garden Design Images
Rock garden landscaping

HowStuffWorks "How to Build a Rock Garden "
A natural-looking rock garden

Monday, February 17, 2014
winnie the pooh bedroom ideas winnie the pooh decor Pooh And Piglet winnie pooh and friends themed bedrooms Eeyore decor bee decor bear decor
Invite the delightful world of Winnie the Pooh and his friends into your home

Theres always time for fun with Pooh and Piglet hanging around. Now these lovable pals from the Hundred Acre Wood swing into your home to brighten every moment with their special friendship

When it comes to learning about the joys and rewards of friendship, it is a sweet lesson when its taught by Pooh himself. Through thick and thin, this bear is one pal who will stick to you like "hunny"!

Handcrafted, fully sculpted wall clock has umbrella with classic Disney art and Pooh and Piglet swing from the pendulum. Precision quartz movement.
These lovable pals from the Hundred Acre Wood swing into your home to brighten every moment with their special friendship with the Pooh and Piglet Blustery Days Wall Clock.
A first-ever animated timepiece from The Bradford Exchange, this fully sculptural work of art brings the joy of childhood playmates to your day as only these Disney best friends can. With one paw holding onto the umbrellas handle and the other sweetly wrapped around his pal Piglet, a fully dimensional Winnie the Pooh and Piglet swing back and forth as the minutes tick by. Both Pooh and Piglet are skillfully sculpted with a textured finish evoking the look of soft plush.

Nobody says it better than Winnie the Poohs friend, Eeyore: "Some Days Look Better Upside Down." The endearing Eeyore always offers a unique perspective on life

Cheer up, Eeyore! This colorful wall decal of Poohs gloomy friend is perfect for nurseries or a childs bedroom.
Pair Eeyore with Tigger, Pooh, and Piglet wall decals

Handcrafted Eeyore lamp inspired by Louis Comfort Tiffany stained-glass art, showcases donkey standing on head.
Theres no gloom and doom here - just smiles as everybodys favorite donkey turns a bad day upside down and shines bright! Bradfords first Eeyore lamp is inspired by the world-renowned Art Nouveau stained-glass artwork of Louis Comfort Tiffany.
The loveable donkey from Disneys Animated Classic Winnie the Pooh steals the show by standing on his head with a big smile on his face and tail hanging down, while balancing with his front legs.
This Eeyore decoration from The Bradford Exchange is handcrafted, then hand-painted to capture the translucent look of the stained glass with dark "leading." Lit or unlit, this lamp makes a wonderful addition to your home or office. Strong demand is expected for this Winnie the Pooh decor, so order now!

The wonderful thing about Tiggers... is that this one can go right on your wall!
This bouncy, trouncy, and fun Tigger wall decal is perfect for nurseries and bedrooms

Up, up, and away!
This adorable set of Pooh and Piglet wall decals is the perfect addition to any nursery or childs bedroom.
Pooh soars high into the sky with a set of colorful balloons, complete with his good friend Piglet and some friendly butterflies.
How can anyone resist such cute characters?

Watch your little ones grow with the help of this adorable Pooh and Friends peel and stick growth chart.

variety of
Winnie Pooh wall quote decals - variety
If your room needs a little Disney magic, look no further. This wall decal of Tigger from the classic Winnie the Pooh series is great for fans of any age. Winnie the Pooh and Tigger, too! Celebrate the timeless tale of Winnie the Pooh and his friends.

Winnie The Pooh Nursery Ideas


Winnie the Pooh and his favorite friends are dreaming of hunny again. This adorable collection features a combination of stripes and prints in soft earthen hues like ivory, tan, brown and sage as well as plush applique and embroidery.


for more decorating ideas and decor also visit
Winnie the Pooh Theme Bedroom Decorating and Decor
Rustic Style Theme Bedroom decorating and rustic style decor - bear decor
Garden Theme Bedroom Decorating and garden theme decor
Rainbow Theme Bedrooms
Cloud Theme Decor and Sun theme Decor
Outdoors Theme Bedroom Decorating and Decor
Forest Theme Bedrooms
Peter Rabbit - Bunnies Theme
Ladybug Theme Bedrooms
Baby Garden Theme Bedrooms
Polar Bear Theme Bedrooms
Panda Bear Theme Bedrooms
Disney Characters:
Mickey Mouse theme bedroom decorating ideas and decor
Cinderella Theme Bedroom decorating and decor ideas
 is copyrighted work by Maries Manor Kids Theme Bedrooms